Most berries like strawberries and blackberries can be picked, rinsed, and enjoyed straight from the bush. Elderberries are different, and that’s exactly what catches many first-time foragers off guard. Knowing how to prepare elderberries for consumption is the difference between turning them into delicious syrups, jams, and teas—or vowing never to eat them again.
Interestingly, the kitchen isn’t the only place elderberries have earned a reputation. For centuries, they’ve also been prized for the rich purple pigments used to dye fabrics, paper, and craft projects.
While dye makers simmer elderberries to extract as much color as possible, preparing them for food is different and focuses on making them safe, flavorful, and ready for your favorite recipes.
Why Elderberries Need a Little Extra Preparation
Unlike blueberries or raspberries, elderberries contain naturally occurring compounds called cyanogenic glycosides. These are found mainly in the stems, leaves, seeds, and unripe green berries. In large enough amounts, they can cause nausea, stomach cramps, vomiting, and diarrhea.
The good news is that preparing elderberries properly is surprisingly simple. Removing the stems and cooking the ripe berries significantly reduces these compounds, leaving you with fruit that’s ready for a wide range of culinary uses.
That extra step might seem inconvenient at first, but it’s one of the reasons elderberries have traditionally been transformed into preserves rather than eaten by the handful.
Start with Fully Ripe Berries
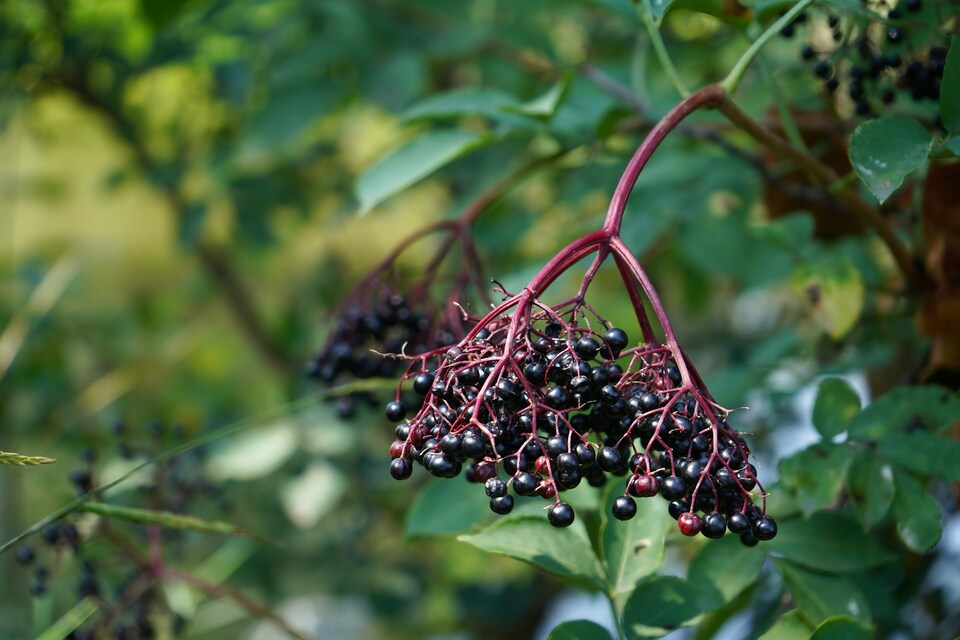
Ripe elderberries should be a deep purple, almost black color with a slight sheen. If you spot green or bright red berries mixed into the cluster, remove them before you do anything else. Those immature berries haven’t fully developed and shouldn’t be included with the ripe fruit.
The stems deserve just as much attention. They may seem harmless, but they contribute bitterness and contain higher concentrations of the same naturally occurring compounds you’re trying to avoid.
Many experienced foragers have a simple trick for making this job easier. Place the berry clusters in the freezer for an hour or two, just long enough for the fruit to firm up slightly. Once chilled, the berries often fall away from the stems with far less effort and considerably less mess.
It’s a small step that can save a surprising amount of time when you’re working with several pounds of fruit.
Wash Them Gently
Once the berries have been removed from their stems, give them a gentle rinse under cool running water.
Avoid soaking them for long periods. Elderberries are delicate, and extended soaking can cause them to split, making them more difficult to cook and strain later.
As you rinse, take another quick look through the berries. It’s common for tiny pieces of stem, leaves, or the occasional unripe berry to sneak through during destemming. Spending an extra minute removing them now will improve both the flavor and the quality of whatever you’re making.
The Best Preparation Depends on What You’re Making
One of the biggest misconceptions about how to prepare elderberries for consumption is that there’s a single “correct” method.
The first few steps—destemming, rinsing, and cooking—are largely the same. After that, the preparation changes depending on what you plan to make.
1. Elderberry Syrup
If elderberry syrup is your goal, place the cleaned berries in a saucepan with water and gently simmer them until they’ve softened and released their juice. Once cooked, mash the berries lightly before straining the liquid through a fine sieve or cheesecloth.
Only after straining should you stir in sweeteners such as honey or sugar. This helps preserve their flavor while giving the syrup its characteristic smooth texture.
2. Jam and Jelly
Jam takes a slightly different approach.
Rather than removing all the fruit solids, many recipes keep much of the cooked pulp to create a richer spread. Depending on the natural pectin levels of your berries, you may need to add pectin to achieve the consistency you’re after.
The result is a preserve with a deep berry flavor that’s equally at home on toast or paired with cheese.
3. Juice
Fresh elderberry juice should also be heat treated before drinking.
Once the berries have softened, strain out the skins and seeds before bottling or using the juice in other recipes. Heating not only improves safety but also brings out the fruit’s earthy, slightly tart flavor.
4. Tea
Dried elderberries are commonly used for herbal teas.
Rather than simply pouring boiling water over the berries, most herbalists recommend gently simmering them for several minutes. This extracts more flavor while ensuring the berries have been adequately heated before consumption.
Freezing and Drying for Later
Elderberries have a relatively short season, so preserving them is part of the preparation process for many households.
Freezing is one of the easiest options. Once the berries have been cleaned and destemmed, spread them on a tray until frozen before transferring them to freezer bags. Freezing them individually prevents one large frozen clump and makes it easier to measure exactly what you need later.
Drying is another excellent choice, particularly if you enjoy making tea or want to store elderberries for several months without taking up freezer space.
It’s worth remembering, though, that freezing or drying doesn’t replace cooking. Even preserved berries should be cooked before they’re used in food or drinks.
Elderberries Aren’t Just for the Kitchen
One of the more fascinating things about elderberries is that their usefulness extends well beyond food.
For generations, people have simmered ripe elderberries to extract a deep purple dye for wool, cotton, paper, and other natural materials. The preparation looks surprisingly similar to making syrup at first—the berries are cleaned, crushed, and heated—but that’s where the similarities end.
When preparing elderberries for dye extraction, the goal is to draw out as much pigment as possible rather than create something pleasant to eat. Flavor, texture, and sweetness don’t matter because the finished liquid is destined for fabric or craft projects instead of the dinner table.
It’s a wonderful reminder that one humble berry can serve entirely different purposes depending on how it’s prepared.
Mistakes That Can Spoil the Whole Batch
Preparing elderberries isn’t difficult, but there are a few mistakes that catch beginners time and again.
Probably the most common is rushing the destemming process. A few tiny stem fragments may not seem significant, but they can leave the finished syrup or jam tasting noticeably bitter.
Another is assuming that juicing fresh elderberries makes them automatically safe to drink. The berries still need to be heated before they’re ready for consumption.
Some people also become impatient with mixed clusters, leaving green berries in with the ripe ones to save time. It’s better to discard the unripe fruit than risk affecting both the flavor and the finished product.
Finally, don’t confuse preservation with preparation. Freezing and drying help extend the berries’ shelf life, but they don’t replace the cooking step needed before eating them.
A Little Preparation Goes a Long Way
Learning how to prepare elderberries for consumption isn’t about making the process complicated—it’s about understanding why this remarkable fruit deserves a little extra attention.
Once you’ve removed the stems, washed the berries carefully, and cooked them properly, elderberries become one of the most versatile ingredients you can have on hand. They can be transformed into richly flavored syrups, homemade jams, soothing teas, desserts, and even natural dyes that have been valued for centuries.
It’s a little more work than popping a handful of blueberries into your mouth, but most people who take the time quickly discover the rewards are well worth the effort.